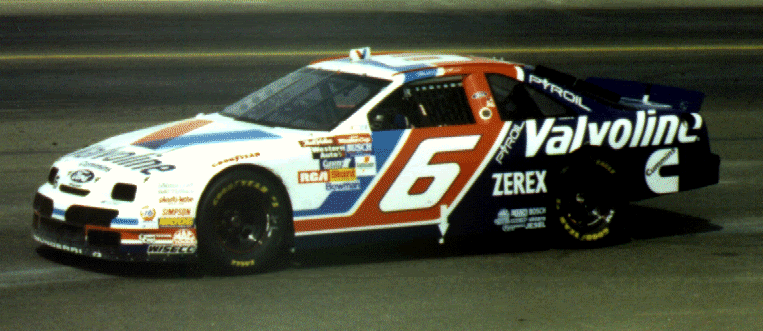
For this tutorial, I primarily use Paint.NET, a freeware image editing program, along with an IMPORTANT Photoshop plugin that can be found here.
For some cases, I use GIMP to help me out with things Paint.NET can't do, such as selection growth and making certain PSD's compatible with Paint.NET.
In this tutorial, we will be recreating Mark Martin's 1995 Valvoline Ford.

I will be using the 1992/1993 Thunderbird template from MasGrafx.

STEP ONE: Rearrange contingencies
For cars with designs on them, rearrange the contingencies so that they match the car you are recreating. These can be used as guidelines for the base later on. Also, if you want, you can add the base color of the car to the base layer. For the sake of being able to see the contigs, I chose not to add the base just yet.

STEP TWO: Setting "markers" for the paint scheme
I always set contingencies first because of this next step, where we pinpoint where a certain feature of the scheme is using the side windows and contigs as a base. This picture shows my mental process of how I go about this. Of course, you will need to take into account the angle of the picture and/or the contours of the car. If you want, you can physically add these lines in a new layer to help you. You'll have to delete the layer later on.
NOTE: It would be smarter to align based on the same side (driver-to-driver or psngr-to-psngr) of the car, but what I'm doing here does work as well, you just need to account for fractions of distances along a certain sticker, instead of placing the mark between certain letters.

STEP THREE: Mirroring Paint Scheme
Instead of having to do this again, I have a much easier way to mirror the scheme to the other side. First, select the lines, making sure that the selection includes the entire scheme so far, and that the bottom line ends right at the bottom of the skirt.

Another important thing to note is the height of the selection, which can be found in the lower left corner of the window n Paint.NET. The number doesn't have to be 399, just as long as you can remember the number.

After this, copy and paste the layer in the exact same place it is. You may have to zoom out to the entire picture in order to do this. After you've pasted, using the bottom center point, drag the picture past the upper line and until the height is the special number again.
ALSO, make SURE the line is right up to the bottom of the other skirt.

You can fill in the paint scheme after this if you wish. This is explained further in techniques down below.
STEP FOUR: Adding Logos
Much like when you were adding the paint scheme, the contingencies will, again, serve as benchmarks for your logos. And, the logos you place can also serve as more benchmarks, and so on. Except this time, these marks will be used to create rectangles. Again, it would be easier to match sides of the car, but you don't have to.

Then, select the area within the rectangle using the rectangle selector. The distances will again be shown in the corner, and these numbers will be important.

Load the number up in the image editor, I'll be using Jeeble's #6 for the number. After loading, crop the picture so that there is small space between the number/logo itself and the border of the image, the reason is further explained below.

Taking the dimensions from your rectangle (again, they do not HAVE to be 166 by 111), resize the number/logo according to the numbers. It doesn't matter if it doesn't match up with proportions. Then place the number/logo on the car on a new layer.

Once this is done, you can reposition or even resize the number as you feel to make it fit more with the real picture.
NOTE: If you resize the number after pasting, it would be smart to go back and resize the original, full-sized and cropped logo with the new dimensions you've changed it to, simply to avoid extra blurs.
